Table of Contents
ToggleLaptops are like loyal companions—they keep you connected, entertained, and productive. But what happens when that trusty sidekick starts acting up? From a cracked screen to a stubborn keyboard, laptop component issues can feel like a personal betrayal. Fear not! With a little know-how and the right tools, anyone can become a DIY laptop repair hero.
Overview of Laptop Component Repair
Laptop component repair encompasses several tasks aimed at restoring functionality. Key components often require attention, including screens, keyboards, batteries, and hard drives. Identifying the specific issue represents the first step in the repair process. A cracked screen may need replacement, while a malfunctioning keyboard could necessitate cleaning or part replacement.
Repairing laptop screens typically involves careful disassembly. Technicians start by removing screws and carefully disengaging the frame. Options for replacement screens include OEM parts or third-party alternatives, with varying costs and quality. For keyboards, a simple reattachment or replacement of individual keys may suffice for minor issues.
Addressing battery problems may involve checking connections or replacing the battery entirely. Laptop batteries lose efficiency over time, often requiring replacement every two to four years. Users should look for signs of swelling or underperformance, which signal the need for a new battery.
Hard drive issues may manifest as sluggish performance or error messages. Upgrading to an SSD can dramatically enhance speed, but data backups remain essential before any changes. Removing a hard drive typically requires loosening screws and disconnecting cables to avoid further damage.
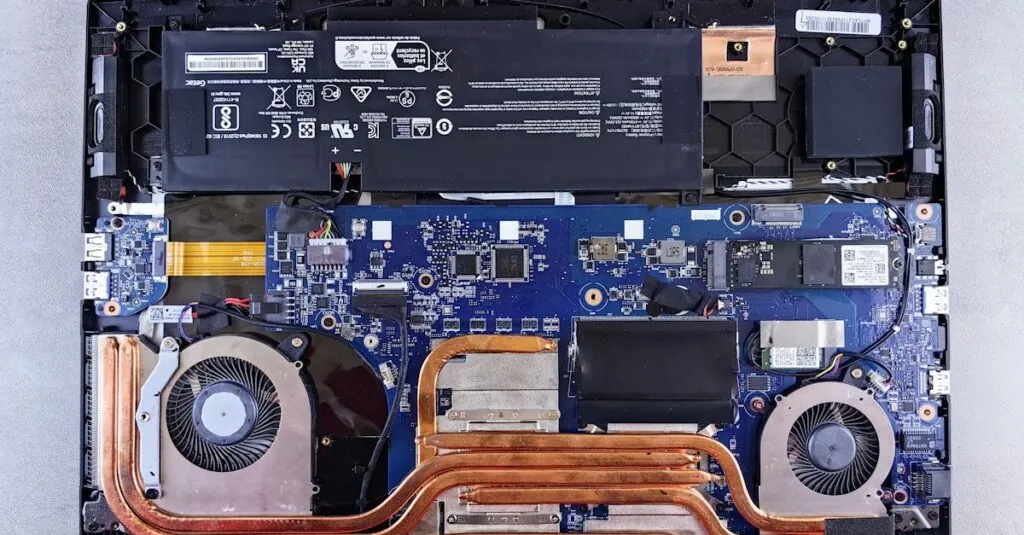
Troubleshooting other components, such as the cooling system or power supply, enhances overall laptop performance. Dust accumulation often clogs fans, leading to overheating. Regular cleaning may prevent these issues, prolonging the lifespan of internal components.
By understanding these repair options, individuals can address common laptop issues efficiently. Equipped with basic tools, many laptop repairs become manageable DIY tasks. Proper techniques ensure successful outcomes, saving time and money while maintaining device functionality.
Common Laptop Components That Need Repair
Laptops often face component issues that require repair. Addressing these problems promptly can extend device life.
Motherboard Issues
Motherboard issues can manifest as unexpected shutdowns or failure to boot. Diagnosing these problems typically involves checking for corrosion, loose connections, or burnt components. Repairing a motherboard often proves complex, but specialized tools can assist with soldering and component replacements. Sometimes, replacing the entire motherboard becomes the only viable solution, especially if damage is extensive.
Hard Drive Failures
Hard drive failures frequently result in slow performance or data loss. Signs like unusual noises or error messages indicate the need for attention. Backing up data always becomes crucial prior to attempting repairs. Replacing a traditional hard drive with a solid-state drive (SSD) can significantly enhance speed and responsiveness. Additionally, troubleshooting hard drive connections and running diagnostic tests can help identify issues early.
Battery Problems
Battery problems often reveal themselves through rapid discharging or swelling. Checking connections or replacing the battery can resolve many issues. When swells occur, it’s essential to replace the battery immediately to prevent safety hazards. Lithium-ion batteries typically last between 2-5 years, so monitoring usage helps determine when replacements are necessary. Maintaining proper charging habits further supports battery longevity.
Tools and Equipment Needed for Repair
Essential tools make laptop component repair straightforward. A screwdriver set is necessary for opening the laptop casing. Various sizes, particularly Phillips and flat-head, address different screws found inside most laptops.
Anti-static wrist straps protect sensitive components from electrostatic discharge during repairs. They ensure safe handling of internal parts, especially circuit boards and chips.
Tweezers facilitate handling small screws and components, making precise movements possible without damaging surrounding areas. Similarly, spudgers allow users to pry open devices without scratching external surfaces or risking internal damage.
A multimeter aids in diagnosing electrical issues. It measures voltage, current, and resistance, assisting in the identification of faulty components.
Also, thermal paste is crucial for CPU and GPU repairs. After resealing components, applying fresh thermal paste ensures optimal heat transfer between chips and heatsinks.
If screen replacement is necessary, a screen replacement kit simplifies the process. These kits often include the necessary tools, adhesives, and protective gear.
Additionally, cleaning supplies should not be overlooked. Compressed air removes dust from fans and vents, preventing overheating. Microfiber cloths clean screens without scratching surfaces.
For safety, using a work surface mat keeps all components organized and prevents loss. By ensuring all tools and equipment are available, laptop repairs become manageable and efficient tasks.
Step-by-Step Repair Process
Repairing laptop components involves a systematic approach to ensure successful outcomes. Understanding the specific issue allows for efficient troubleshooting and repair.
Diagnosing the Problem
Start by conducting a thorough inspection to identify the symptoms. Check for physical damage such as cracks or dents, and listen for unusual noises from the hard drive. Utilization of diagnostic software can help pinpoint software-related problems. Noticing the laptop’s behavior, such as unexpected shutdowns, indicates motherboard or power supply issues. Taking comprehensive notes during this phase aids in tracking identified problems and can streamline subsequent repair efforts.
Disassembling the Laptop
Gather the necessary tools before beginning disassembly. Use a screwdriver set to carefully remove screws from the back panel. Removing the battery and unplugging the power supply ensures safety during the process. Take care when using a spudger to disconnect cables, as damaging them may complicate repairs. Document each step with photographs to facilitate proper reassembly later. Customized kits may provide specific components tailored to the model, ensuring a smooth disassembly.
Replacing the Component
Select OEM or compatible replacement parts based on the diagnosis. Ensure each component matches the specifications for proper fit. Handle fragile pieces, such as screens or batteries, with caution to avoid further damage during installation. Utilize thermal paste for CPU or GPU components to ensure proper heat dissipation. After placing the new part, securely reattach all connectors and screws to maintain stability within the device.
Reassembling the Laptop
Begin reassembly by following the documentation prepared during disassembly. Replace the back panel, ensuring all clips and screws align correctly. Verify that the battery is connected and the power cord is plugged in before closing the casing. Conduct a thorough inspection for loose connections or misfit components that could lead to issues during operation. Power on the laptop to confirm functionality, ensuring all replaced components are working as intended.
Safety Precautions During Repair
Ensuring safety during laptop component repair protects both the individual and the device. Always work on a clean, flat surface to prevent damage. When handling sensitive electronic components, wearing an anti-static wrist strap is essential. This strap discharges any static electricity, reducing the risk of harming sensitive parts.
Disconnecting the laptop from power sources, including batteries, prevents electrical hazards. Avoid repairs on surfaces that generate static, such as carpets. Keeping tools organized helps streamline the repair process and minimizes risks of losing small parts.
Using proper tools is crucial, as they are designed for specific tasks. A screwdriver set suited for electronics ensures the right fit for screws, reducing the chance of stripping. During component disassembly, gently lifting connectors and avoiding excessive force prevents damage.
Taking frequent breaks maintains focus and prevents fatigue, which can lead to mistakes. It’s wise to document each step of the process to aid reassembly. Photographing or noting how components fit together creates a reliable reference.
Using caution with batteries is critical. Signs of swelling or leakage indicate a need for careful handling and prompt replacement. Adhering to battery disposal guidelines ensures environmental safety.
Testing components with a multimeter can help identify faults without causing additional damage. Connectors should be plugged in securely, with careful verification before reassembly. In the case of a motherboard repair, observing for dust or corrosion before cleaning maintains overall performance.
By following these safety precautions, individuals can effectively manage laptop repairs while minimizing risks and ensuring their devices remain functional.
Laptop component repair can seem daunting but it’s entirely achievable with the right knowledge and tools. By identifying specific issues and following a systematic approach, individuals can tackle repairs ranging from cracked screens to battery replacements.
Understanding the importance of proper documentation and safety precautions ensures a smoother process. With a little patience and attention to detail, many common problems can be resolved effectively.
Embracing DIY repairs not only saves money but also prolongs the life of the device. With the right mindset and preparation, anyone can become adept at maintaining their laptop’s functionality.